Showing posts with label #edible art. Show all posts
Little Girl's Birthday Request!
Tip 104 was used to make the ruffle design using buttercream. The words, the flowers and the butterflies were made out of fondant. The birthday girl asked for a disney princess themed cake so I included candles to match the theme. I hope that she enjoyed her cake!
Thanks for visiting today! Don't forget to share pics of your edible 'kreations'. Till next time, "Happy Baking!"
Skipped the Pie for An Edible Bundle of Gifts This Thanksgiving!
Yay! The holidays are here!
Thanksgiving day was great and the occasion gave me an opportunity to reflect on the blessings in my life. I am so grateful for all the blessings AND the disappointments in my life; to echo my pastor's sermon, a joyous life requires an 'attitude of gratitude'.
I am also thankful for those of you who read my posts! All the best for the holidays!
Let's get to Baking!
.jpg)
The bottom layer of this cake was a simple white cake recipe and the top layer was a Vanilla Cake recipe. Since this cake was for my household's consumption, I decided it would be a best time as any to conduct a trial. Here we go!
The top layer was actually pieces from a cake I had torted. I filled a 6 inch cake pan half way with the cake crumbs, I spread a layer of icing and then I put some more cake crumbs to fill the cake pan. I then leveled it with my hands and froze the cake overnight.
When I removed the cake from the pan, I had a 6 inch cake ready to be covered with butter cream. From then on, the sky is the limit as we decorate this cake!
Additional items used:
silicone pot holder with a diamond design (food grade silicon) - used on the top layer. In my kitchen, this holder is used solely for use on fondant. It is imperative that any kitchen item used to make impressions on fondant should be used solely for that purpose.
bubble straws - Used as dowels in the bottom layer of the cake to create the support system for the top layer
Fondant Mold - Used for the pearl border
Circle cutters - Used for the polka dots
![]() |
| 'Edible bundle of Gifts' on our Thanksgiving table |
Lessons learned:
- Parchment Paper would be useful when reshaping the cake crumbs into a cake like I need in my 'trial' for the top layer.
- Do not despair when there are cracks/tears in the fondant. Decorations can be used to cover up the imperfections. I hope that over time, there will be less occurrence of the cracks /tears in the fondant, but for now, covering it up will do the trick.
Toast to the Holidays!
Mickey Mouse Themed Cake
Cake4Kids Mickey Mouse Themed Cake
I am so excited to be a volunteer with Cake4Kids! Baking for kids gives me so much pleasure; I get to spend time doing something that I love and at the end of the day the cakes bring smiles to the faces of many kids that would have otherwise not have a cake to celebrate important milestones. Visit the Cake4kids website to learn more about the good works of the organisation or to provide support.
Let's get to Baking!
The simple white cake recipe yielded two 8 inch cakes. At first I was concerned that the batter wouldn't divide between the two cake pans but the cake rose high enough and it was also quite even so there was no need to tort the cake. The layers were filled with Betty Crocker Chocolate frosting. The entire cake was then frosted and refrigerated so that the frosting can set.
The request was for a Mickey Mouse themed cake. Since it was for a very young child, I decided to use frosting as the final coating rather than fondant. Fondant was used though for the decorations. Red and black fondant were used to add the final details to the cake. And now it's time to deliver this cake to the birthday boy!
The Gluten-Free Birthday Cake
![]() |
| Obtained from Cup4Cup Website |
Let's get to Baking!
Cakes for a Good Cause!
Cake Auction for the LAM (lymphangioleiomyomatosis) Foundation (Sunnyvale)
It is great to get the opportunity to bake for a good cause. Our church had a pastry auction to benefit the Foundation and I was thrilled to participate. Please feel free to visit the Foundation's website to learn more about lymphangioleiomyomatosis or to make a contribution.
For this cake, two 6 inch round cakes (White Wedding Cake Recipe) were layered with butter cream in between. The cake was then crumb-coated and covered with white fondant. The diamond cutter set would come in handy in this design; a diamond quilted impression mat would be more efficient though. For this cake, one of the smaller cutters was used to make the diamond patterns on the side of the cake. A fondant embosser/tracing wheel can be used to trace the diamond patterns to create a quilted look. To finish off the cake, sugar pearls were placed where the diamonds intersected and the ball tool was used to create the borders. Since designing this cake, I've obtained alphabet and numbers fondant cutters, so I'll be using those for writing on the cakes in the future.
I decided to try my hand at a book cake; I may add that it's a very small cake. A 6 inch square cake was cut in half and layered with buttercream. The writing and the borders were freehand. I look forward to trying another book cake!
Cupcake Bouquet - Great Gift or What?
It's an edible bouquet! What a wonderful Gift!
Is it party season yet? Hmmm.....maybe, you can bring along a beautiful cupcake bouquet; it would be a wonderful surprise. I absolutely love cupcake bouquets. To make this bouquet, I bought two different baskets but then I saw this black and white bowl at Ross and I thought that this is the one! Maybe some other time I will make more bouquets using those other baskets; all I need is an occasion to make some cupcakes!
Let's get started on your gift basket!
The Fashionista's Purse
It was so much fun getting this cake done with Esther Lee Leach. We wanted to do something fashionable and edible, so what would be better than a 'purse cake' with some accessories!
I was nervous putting together my first purse-cake but luckily I had support and great ideas from my co-cake decorator for the day, thanks Esther!
Celebrating in Purple!
This birthday cake was made for a special little girl. A Wilton Heart Pan was used to bake this cake. After the cake was placed on a cake board, it was crumb-coated with home-made buttercream icing. The cake was left for about half an hour to crust, then a second layer of buttercream was spread on the cake. Please see this video to learn how to create a smooth finish. For the borders, I used the star tip to create the design around the cake. The #1 tip was used to write on the cake and to draw the hearts. The cake sprinkles were applied liberally to add the final touch. Voila!
Welcome Home Daddy!
Just a little something to welcome daddy home after a long day's work. You don't always need a special occasion to make your cake and eat it too!
This 8 inch cake was crumb-coated with buttercream icing. It was then covered with home-made marshmallow fondant. I used this recipe. The #1 tip was used to write on the cake. After, the star tip was used to decorate the cake alternating between white and purple buttercream (blue and red icing color were added to the white buttercream to obtain the purple color).
Did you do any baking today? Share any tips or advice below.
A Cake For A Very Special Birthday Princess!
My niece turned four in August! They grow up so quickly! For this special birthday, I decided to bake and decorate her birthday cake and make it an 'aunty and niece' bonding moment. Oh, we had so much fun working on the cake. Actually she also enjoyed taking pictures after she got bored working on the batter; some of the pics highlighted below were taken by her. My multi-talented niece!
Let's get started on the cake!
- Bake your cakes and let cool. My sister-in-law and I baked the cake the night before therefore it had ample time to cool. Some bakers refrigerate/freeze their cakes to firm up the cake before torting or carving. Some leave their cake at room temperature; covered on the counter. For this cake, three 6 inch round cakes were used for the bottom layers. The top cake is a 6 inch Wilton sports ball cake pan (the Wilton sports ball cake pan set comes with two halves but only one half is needed for this cake.) In the first pic, I have stacked the cakes beforehand to get an idea of what it would look like.
- Tort and level the cakes. Check out this video for assistance. The video also shows you how to fill the cakes.
- Wrap an 8 inch circular cake board with foil. Place some icing in the middle of the cake board. The icing acts as glue to keep the cakes on the board.
- Place the bottom (first) layer on the iced board. Fill the first layer with the buttercream icing or a filling of your choice (see the video referred to in point #2). Continue this process until the last layer is in place. The second pic shows four 6 inch cakes (3 round cakes and 1 part of the sports cake pan) that were torted, leveled and filled with buttercream frosting. The Wilton doll cake mold can be used in place of the multiple cakes.
- Now it is time to frost the whole cake. Place icing on the top of the cake and using an spatula spread it on the cake; use as much icing as you need. Try to make it as smooth as you can. This video is a good resource to learn how to get a smooth finished look. It doesn't have to be perfect though since this cake will be covered with fondant.
- Roll out your fondant. I had to roll mine out several times to make sure that I had the right size. If you don't have a ruler or a rolling mat with measurements, you may have to use the trial basis until you get the right size. Soon enough, you'll be able to eyeball it; I am still working on that!
- After you've placed the fondant on the cake, it is now time to make the dress pleats. You can go wild at this point to give the dress the design that you want.
- Roll a small piece of fondant in the color of your choice (preferably the same color as the dress) and roll it around the doll pick. Go ahead and design the top. It is time to put the Wilton doll pick into your cake. Make sure that you choose the part of the cake that you would like to be the front of the cake and position the doll accordingly.
- At this point I used the tools from my gum paste tool set to add details to the dress. I particularly used the stitching/quilting tool to add stitches to the skirt of the dress and to the top of the dress as well.
- Additionally, I used a star tip and buttercream icing to make a drape-like pattern to the front of the dress. I also used it to add dots (star-shaped) of icing around the dress to add to the details. I used a small star tip to add details to the top of the dress as well.
- Finally, I added fondant earrings and a fondant necklace to finish the look.
Please share any other designs that you may have for a princess cake. And please don't forget to leave your comments below.
To Quench that Thirst or To Satisfy that Sweet Tooth!
Ice Pops / Ice Lollies (Emma's (my sister-in-law) Method)
*3 cans carnation (12 fl oz)
*1 can condensed milk (14 oz) (use two cans) or add sugar to taste if using one can
water (28 ounces / 3.5 cups)
nutmeg (to taste)
Food/icing color (optional)
Baby Shower Cake
Tiny Baby Gum Paste Shoes; YouTube is a gem! I used this tutorial for the shoes.
Top Layer: Layered 6 inch square cake carved into a pillow shape
Beach Themed Anniversary Cake
Layered (2 layers) 6 inch cake with blueberry filling.
I had more than a slice! Let me know what you think of the recipe!
The detailed sea shells on this cake were made using the Wilton sea shell mold. This tutorial is a great resource for making those beautiful shells. Of course, I decorated the shells a bit differently based on what I had at home.
This was the first time that I attempted an Eggless Vanilla Cake. I added cherries to the batter before baking and I loved it. In addition, I used blueberry preserve as the filling. Graham crackers were crushed very finely and added to the decorated cake as a final touch. Who knew that Graham crackers can make such tasty 'sand'!
Birthday Cake for the Hubby!
Every time my husband's birthday would come around, I would call the bakeries in the area in search of royal icing covered cake (like we use in St. Lucia). I made those calls when we lived in Louisiana and also when we lived in Texas. However, I soon learned that butter cream was the norm here in the US. I promised that I would learn to make my own cakes so that I can get exactly what I wanted. I am yet to make the perfect 'royal icing covered cake' but recently I made him a cake using the new techniques that I have learned. Maybe one day I'll tell you about the less successful attempts at making home made cakes, lol, including that time when the royal icing was so soft and the cake was so hot that I ended up with a 'hot chocolate-icing' mess. Anyways, we'll leave the stories for another time :)
This year's cake was covered with fondant. Fondant can be described as a sugary dough used to cover cakes. It is usually reserved for wedding cakes but it is particularly popular with bakers who like to specially craft/decorate their cakes to match the occasion. The texture and smoothness of the fondant allows a decorator to use the cake as a canvas. So this is my new art!
Soccer Ball Cake for the Biggest Arsenal Fan
The Wilton Embosser Tool was used to create the stitching on the cake.
Closer Look!
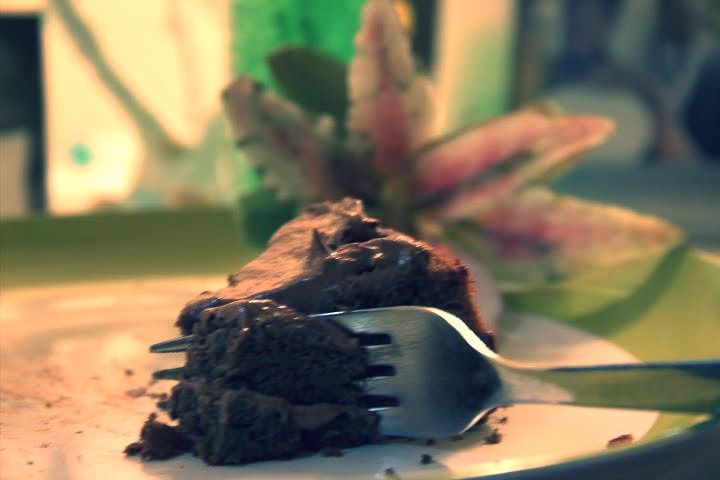
Chocolate Cake with Chocolate Ganache filling
For this soccer themed cake, I used white fondant; the fondant can be bought ready-made. I also dyed some of the white fondant with red icing color to emulate the 'Arsenal' soccer ball design. As you can see, the color was closer to pink rather than red, so next time I will also buy the red fondant rather than trying to color it myself. The tutorial that I used to make this cake, was very thorough and easy to follow. The audio is not in English but you can still learn by watching. Also, I had to order the pentagon and the hexagon cookie cutter shapes from www.cheapcookiecutters.com.
I'll make a special effort to provide detailed notes and progress pictures next time I try this cake. Give me a nudge or leave a comment if you want me to make this cake again soon!
Flourless Cake!!
'So what replaces the flour?' ...My thought exactly :)
To my surprise, as I read through this recipe, I realized that the flour was replaced with black beans.
'Oh my! Really! That cannot taste too good' ....My response exactly.
Well, I set out to bake this cake myself to find out what all the excitement was about.
And can you guess what my reaction was to this cake? And whether my taste buds were delighted?
Indeed they were! This cake is great. I followed the recipe very closely and the results were to 'die for'. To help with the flavor, the cake should be left overnight before the 'moist chocolate-y goodness' is served. It is worth the wait. You won't even remember that black beans were used in this recipe. The chocolate goodness is all you'll think about as you munch away. Anyways that's all I thought about. I really knew it was good when my husband asked for seconds and thirds!
Oooh la la, I look forward to seeing your results! Be sure to tell me whether you enjoyed it.
By the way, do you see the gum paste flowers from last week's post? Look closer at the background.
Gum Paste Flower Bouquet
Fresh picked flowers are great for any event! But what if they are not available or are too costly for your event? Gum paste flowers are a good option and can be prepared in advance. The flowers can be used as a cake decoration (using flower spikes to place the flowers on the cake) or they can also be used in a vase to decorate the room. Your guests may not be able to tell the difference unless they touch it (no guarantees though :) ). The beauty of your hand-made flower/flower bouquet is as good as the details that you apply to every part of the flower.
Some of what you'll need: the leaves mold, color dust of your choice, lollipop stick, floral tape, gum paste, icing colors of your choice, buds.
Next time I do this, I will be sure to put together a tutorial. Send me an email or comment if you want the tutorial sooner!
Subscribe to:
Comments (Atom)


.jpg)
.jpg)

.jpg)
.jpg)

.jpg)
.jpg)
.jpg)

.jpg)
.jpg)


.jpg)


